We are open May 6th - October 8th 2022. Please book directly with us via our website! We look forward to welcoming you at our beautiful place on Cape Cod.

Cape Cod Bay is a photographer's dream, offering dynamic landscapes that change with the tides and seasons. From vast tidal flats reflecting vibrant sunsets to iconic lighthouses and abundant wildlife, the area provides endless opportunities for stunning shots. Planning is key to capturing its beauty - knowing the best times, locations, and gear can make all the difference. Here's what you need to know:
Cape Cod Bay offers unparalleled photographic opportunities, whether you're chasing sunsets, wildlife, or iconic landmarks. With the right preparation and a keen eye for detail, you'll leave with unforgettable images.

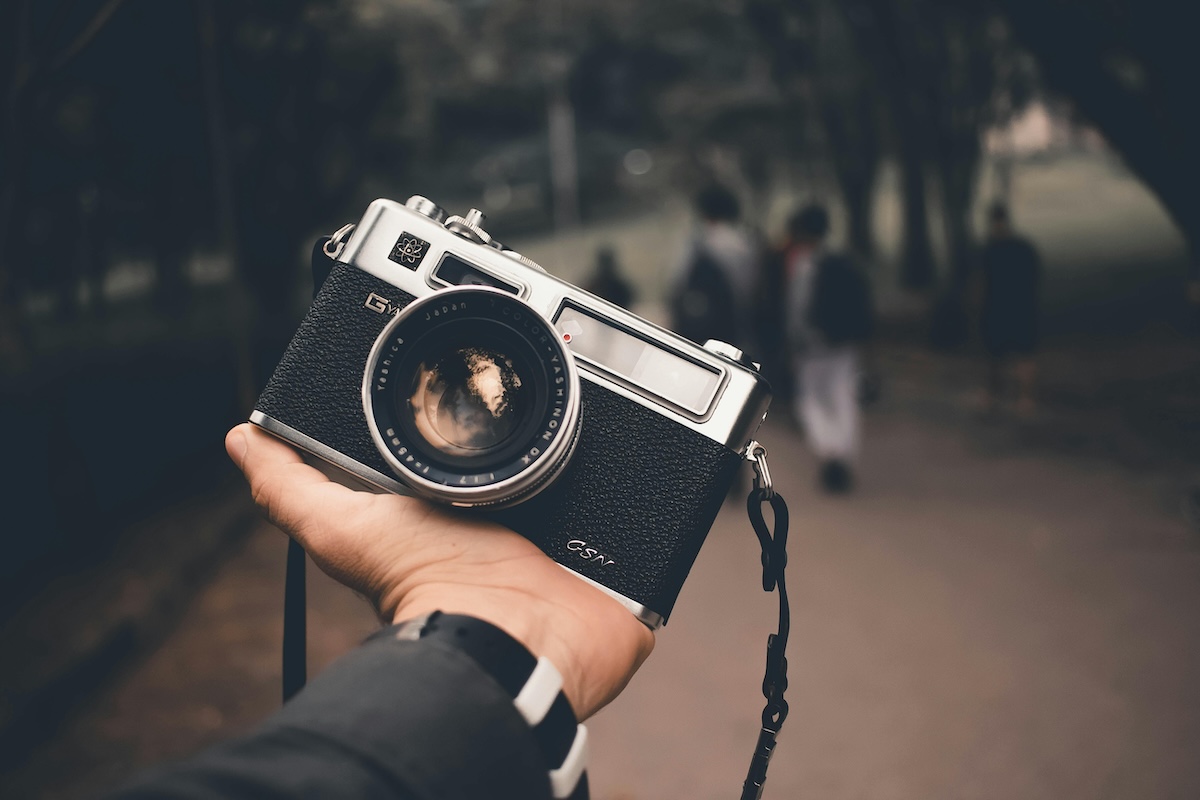
When shooting in Cape Cod Bay, DSLR and mirrorless cameras with full manual controls are ideal for adapting to the area’s constantly shifting light. Mirrorless cameras also have the added advantage of reducing vibrations during long exposures, which is especially helpful for capturing smooth water effects.
For landscape photography, wide-angle lenses in the 16mm to 35mm range are perfect for capturing the expansive tidal flats and sweeping horizons unique to the area. As Loaded Landscapes highlights:
Most seascape shots call for a wide-angle lens, ideally something in the range of a 16mm to 35mm focal length[6]
If your focus is on wildlife photography, such as seals at the Wellfleet Wildlife Sanctuary or shorebirds along the beaches, a telephoto lens with a focal length of 70mm to 300mm or more will help you capture close-up shots without disturbing the animals.
A circular polarizer is a must-have accessory for this environment. It eliminates glare and enhances color saturation on reflective surfaces like wet sand and water. Rob Wood, founder of Light Stalking, explains:
[A circular polarizer] will reduce glints of light on wet rocks or you're looking to cut down on reflections on the surface of the water[5]
For those dreamy, misty water effects, Jim Hamel recommends using a 10-stop ND filter:
I'd recommend a 10-stop ND filter, which is about as powerful as you'll ever need[7]
Additionally, a graduated ND filter will help balance the bright skies with darker foregrounds, especially during sunrise and sunset shots.
A sturdy tripod is essential for keeping your camera stable, particularly in Cape Cod’s coastal winds. Combine this with a remote shutter release or your camera’s self-timer to avoid any vibrations when taking long-exposure shots.
Lastly, protect your gear from the elements by using weather-resistant measures, as the coastal environment can be particularly harsh.
Cape Cod Bay's environment presents unique challenges for photographers. Salt spray, sand, and strong winds can wreak havoc on your equipment. Saltwater is especially corrosive - damaging gear five times faster than freshwater - and the humid air at the beach only accelerates the process[11]. Even bacteria in seawater can contribute to corrosion.
Using weather-sealed camera bodies and lenses is one of the best ways to protect your equipment. Adding a UV filter (around $50) is another smart precaution - it acts as a sacrificial layer, protecting your lens from sand and scratches. A lens hood also serves as a physical barrier against spray and debris.
Photographer Greg Cromie emphasizes the dangers of sand:
Once you get sand inside your equipment, you might as well send it off to the repair centre the next day[9]
To avoid this, never change lenses on the beach. Instead, switch lenses in a sheltered area to minimize exposure. Internal zoom lenses are a safer option than those with extending barrels, as they’re less likely to draw in sand during focal adjustments[8].
A rocket blower (starting at $15) is a handy tool for removing sand from your lens. Always blow off loose particles before wiping with a cloth to avoid scratches[10]. After every shoot, rinse your tripod legs with fresh water to prevent salt buildup and joint seizing[8]. Store all your gear in a waterproof camera bag, and keep it zipped shut when not in use to keep wind-blown sand out[8].
Taking these precautions ensures your equipment stays in top shape, even in the demanding conditions of Cape Cod Bay.
To truly capture the essence of Cape Cod Bay, understanding the interplay between light and tides is just as important as having the right gear. The way light transforms a scene can elevate your photos from ordinary to extraordinary. Michael Freeman sums it up perfectly:
"In almost all photography it's the quality of light that makes or breaks the shot. For professional photographers, chasing the light, waiting for it, sometimes helping it, and finally capturing it is a constant preoccupation – and for some an obsession." [12]
Golden hour - those magical moments during sunrise and sunset - bathes the bay in warm, soft light. This is prime time for capturing silhouettes and rim lighting. Thanks to Cape Cod Bay's west- and south-facing orientation, sunsets here are particularly stunning, painting the sky in rich hues of red, pink, and purple[1]. For today (February 14, 2026), sunrise is at 6:37 AM (direction: 107°), while sunset graces the horizon at 5:14 PM (direction: 254°)[13].
Blue hour, on the other hand, offers a more moody and ethereal ambiance. It occurs 15–30 minutes before sunrise and after sunset, when the sky takes on a soft blue hue, beautifully contrasted by the warm glow of harbor and boat lights[12]. This fleeting period is perfect for creating atmospheric shots, but the lower light levels mean you'll need a tripod to avoid blur from slower shutter speeds[12].
Timing golden hour with low tide can unlock even more dramatic opportunities. Shallow tide pools and exposed sandbars reflect the sunset, creating breathtaking mirrored landscapes. Spots like Rock Harbor in Orleans and Skaket Beach are especially rewarding for west-facing views over the bay during these times[15].
While daily light cycles are crucial, the changing seasons and tides bring even more variety to your photography.
Cape Cod Bay's ever-changing tides and seasonal shifts constantly reshape its landscape, offering fresh perspectives throughout the year.
The bay's tidal range is impressive, with water levels fluctuating between –0.3 ft and 10.6 ft, and spring tides reaching up to 10.9 ft[18][17]. At low tide, locations like Skaket Beach reveal vast tidal flats stretching nearly a mile from shore. These exposed areas showcase intricate patterns and marine life, from sea stars to razor clams[21][1].
For the most dramatic effects, consult tide charts from resources like CapeTides.com or Tide‑Forecast.com. Look for "minus tides", which occur during extremely low tides and expose the widest tidal flats[21][22]. For example, February 19, 2026, will feature a spring tide peaking at 10.91 ft at high tide and dropping to –0.66 ft at low tide, offering incredible opportunities to capture detailed textures and reflections[17].
In mid-February, Cape Cod experiences about 10 hours and 32 minutes of daylight[14][20], but winter photography requires extra preparation. With water temperatures hovering between 30°F and 36°F, icy conditions and freeze-thaw cycles can challenge even seasoned photographers[16][19]. Checking weather reports from local sources like Chatham Airport is essential, as visibility and wind gusts can impact long exposures and equipment stability[23].
The bay's orientation also plays a role in planning your shots. While the western bay side is perfect for sunsets, the eastern, ocean-facing beaches are better suited for sunrises[1]. By aligning your shooting schedule with optimal tide timings and golden hour light, you can create stunning images where shallow tide pools act as natural mirrors, amplifying the vibrancy of the sky's colors.
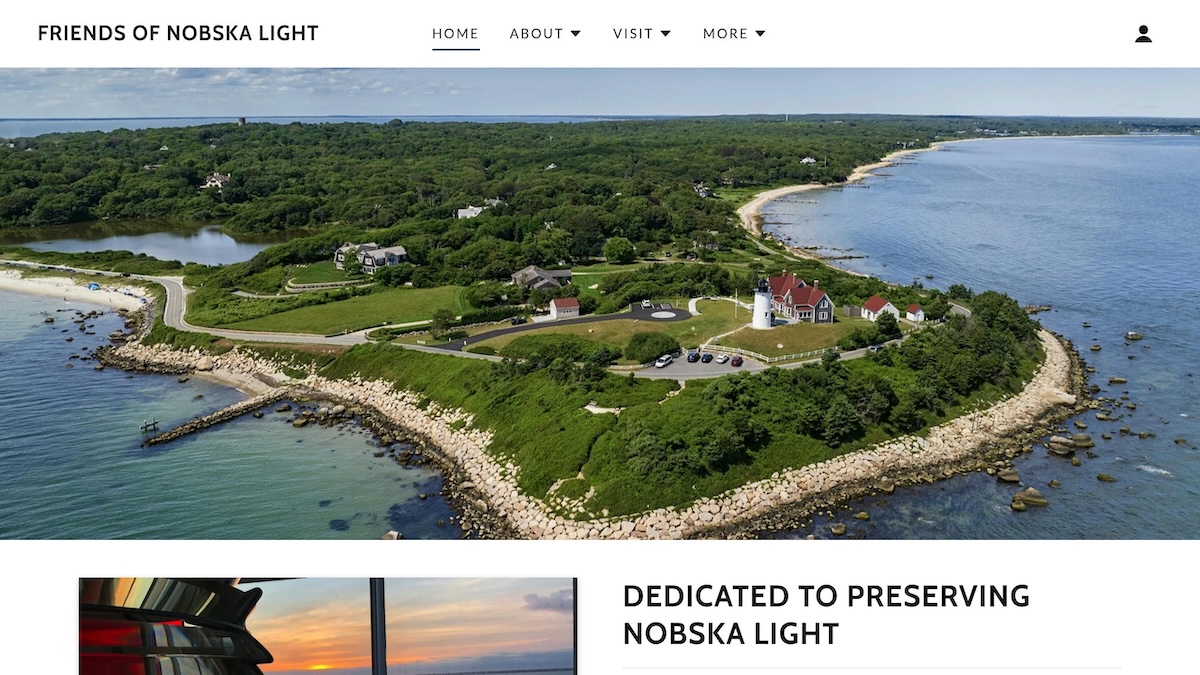
Nobska Lighthouse sits atop a grassy hill in Falmouth, offering stunning views of Nantucket Sound and Martha's Vineyard[24]. This spot is a favorite for sunrise photography, as the early morning light beautifully highlights the lighthouse tower[25]. Photographer Ivan Djikaev from Mind On Photography perfectly sums it up:
Nobska Lighthouse is iconic. And yes, everyone wants to shoot there.[26]
As the day turns to evening, the lighthouse becomes a striking silhouette against the dramatic colors of the sunset sky[1][25].
Meanwhile, Gray's Beach Boardwalk in Yarmouth comes alive at sunset, especially during low tide. The exposed sandbars and tide pools reflect the vibrant hues of the sky, creating a magical scene. The boardwalk itself acts as a natural leading line, drawing the eye toward the horizon[1][15].

For a mix of local charm and natural beauty, head to Chatham Fish Pier and the Sandwich Boardwalk.
At Chatham Fish Pier, you’ll find a blend of maritime culture and wildlife. Fishing boats docked at the pier often attract curious seals, making for dynamic and lively shots[2].
The Sandwich Boardwalk, stretching 1,300 feet across marshlands and Mill Creek to Town Neck Beach, offers endless photographic possibilities. Its long, straight path creates a stunning perspective, especially during golden hour, when the sunlight reflects off the marshes and adds warmth to the scene[2].

Scargo Tower, a 30-foot cobblestone structure perched on a 160-foot hill, provides breathtaking panoramic views. From here, you can see all the way from Provincetown to Plymouth. During the fall, the vibrant foliage contrasts beautifully with the deep blue waters of the bay, making it a must-visit for autumn photography[2].
At Race Point Beach in Provincetown, the sunsets are unforgettable. The beach offers direct views of the ocean, with a nearby lighthouse adding a dramatic focal point to your shots. For wildlife enthusiasts, the adjacent Monomoy National Wildlife Refuge is home to rare species like American avocets, which can often be seen silhouetted in the golden hour light[4][15][1].
Cape Cod Bay offers incredible opportunities for eye-catching compositions, thanks to its mix of natural and man-made features. Take the Gray's Beach boardwalk, for example - it naturally guides the viewer's eye into the marsh. Nearby piers and shorelines create diagonal lines that add depth and dimension to your shots[1][3]. Professional photographer Betty Wiley shares her insight:
"One of my favorite images from the boardwalk was taken right after sunrise, looking back towards the parking area. I prefer to photograph this location at mid to high tide because, at low tide, the rather unsightly marsh mud is exposed." [3]
Reflections are another powerful tool, especially during low tide when sandbars and shallow tide pools act like mirrors for the sunset's colors[1][28]. Similarly, wet sand during the blue hour can create stunning mirrored foregrounds. To add depth to your composition, layer elements: use wet rocks or sand patterns in the foreground, waves or sailboats in the midground, and lighthouses or sunsets in the background for a sense of scale[5][29].
When it comes to horizon placement, lighthouses make excellent focal points to anchor your scene[1][29]. To ensure sharp focus throughout your image, use a narrow aperture between f/8 and f/16. Switching to manual focus and setting your focal point about one-third into the frame can also maximize depth of field[27][3]. A circular polarizer is another handy tool - it reduces glare on wet surfaces and enhances the colors of the marsh. However, avoid using it when shooting directly into the sun[5][3].
For even more dramatic results, long exposures can turn the bay's waters into a dreamy, surreal canvas.
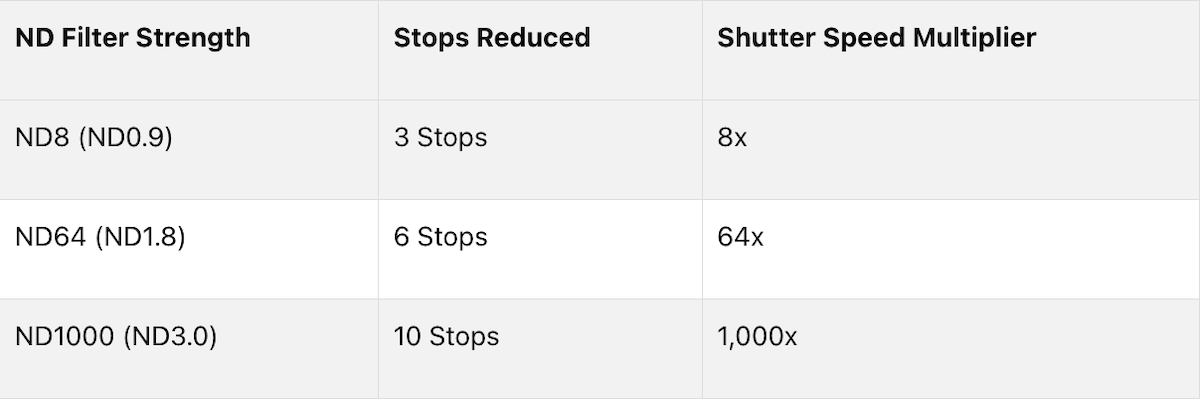
Long exposure photography can transform the bay's waters into smooth, ethereal surfaces. Start with shutter speeds of 1/30 second or slower for a silky effect. For a more misty, dreamlike look, use exposures of 10 to 30 seconds with a Neutral Density (ND) filter[5][27][29]. For example, an ND1000 filter reduces light by 10 stops, requiring a shutter speed 1,000 times slower than your base exposure[30][31].
To keep your images sharp, stabilize your tripod by pushing its legs about three inches into the sand to resist movement from waves[30]. Lock your focus before attaching dark ND filters, as autofocus often struggles with reduced light[30][31]. Cover your viewfinder during long exposures to prevent stray light from creating streaks or washed-out areas in your frame[31]. Apps like PhotoPills or LE Calculator can help you calculate the correct shutter speed when using ND filters[31][32].
Shooting during receding tides often results in cleaner water trails and fewer crashing waves[32]. The blue hour - right before sunrise or after sunset - is perfect for capturing smooth water surfaces[32][5]. During post-processing in Lightroom or Photoshop, clean up any sensor dust spots (a common issue in coastal environments) and aim for balanced colors by referencing the natural tones of the sand[29].
While these advanced techniques can elevate your photography, staying safe in coastal environments is just as critical.
Photographing coastal areas requires a good deal of caution. Always check tide charts using a reliable app like Tides Near Me to avoid getting trapped by rising tides, which can quickly submerge sandbars or block your exit[27][33]. To navigate slippery terrain safely, wear high-traction shoes and bring a headlamp for low-light conditions.
Protect your gear by using rain covers and lens hoods to shield against salt spray and sand. Avoid changing lenses on the beach to keep sand from entering your camera[6]. When moving from the cool coastal air into a warmer indoor space, place your camera in a bag to let it acclimate gradually, reducing the risk of condensation inside the lens or body[29].
Respect wildlife by maintaining a safe distance of at least 25 yards (about the length of two school buses) from coastal birds, especially during nesting season from March through August[34]. On the Outer Cape, be cautious - seals often indicate the presence of nearby sharks[1][26]. Finally, shooting with a partner is always a good idea, ensuring someone is there to help if conditions become dangerous[27].
Stay at a place that blends comfort with creative inspiration, making it a haven for photographers looking to capture stunning visuals.
With its east-facing position on Pleasant Bay, the inn offers a prime location for capturing breathtaking sunrises. The private wooden dock provides a stable platform for those early morning shots, while the Knockabout room’s dormered reading nook frames sailboats and sunrises beautifully. The Daysailer room, expanded by over 50 square feet, offers direct views of the Atlantic waves rolling onto the outer beach[37].
Start your day photographing the blue hour reflections right from your room, then head to the dock for low-angle sunrise compositions. Complimentary kayaks and paddleboards open up unique water-level perspectives, adding variety to your portfolio. Beyond the bay, the inn’s English gardens, complete with a fish pond and fountain, and the adjacent cranberry bog - especially vibrant during the fall harvest - provide plenty of photogenic opportunities without leaving the property[35][36].
After a morning of shooting, return to accommodations designed to support your creative endeavors.
Recharge in a space that’s been thoughtfully crafted for photographers. The inn’s nine boutique rooms offer a quiet and inviting retreat, ideal for reviewing your shots and planning the next session. The concierge is on hand to help organize trips to nearby photography hotspots and provide tide schedules for the best shooting conditions. Plus, free WiFi throughout the property ensures you can easily upload and edit high-resolution images.
Start your day with a European-style breakfast featuring smoked fish, cured meats, specialty cheeses, and fresh fruits - a perfect way to fuel your photography adventures. Each room includes a private spa bathroom, offering space to clean your gear and unwind after a day spent on Cape Cod’s sandy shores. Conveniently located between Chatham and Orleans, the inn is just a 15–20 minute drive from iconic photography locations like Scargo Tower and Sandwich Boardwalk. Named the Most Charming Bed & Breakfast in MA at the 2023 LuxLife Hospitality Awards, this property balances luxurious comfort with the practical needs of photographers[35].
Cape Cod Bay offers a stunning playground for photographers, with its 1,300-foot Sandwich Boardwalk, glassy low-tide reflections, and breathtaking sunset silhouettes of lighthouses and sailboats. The bay's west-facing orientation ensures those warm, golden hues at sunset, while the seemingly endless stretches of white sand and sandbars provide countless ways to frame the perfect shot[1][38].
To make the most of your time here, choosing the right base is key. Staying close to the water enhances both convenience and inspiration. A Little Inn on Pleasant Bay, nestled between Chatham and Orleans, is an excellent choice. With its private dock and east-facing views, it’s perfect for capturing serene sunrise moments. The comfortable accommodations and waterfront setting make it easy to focus on your craft while enjoying the beauty of the bay.
If you're planning a visit, book 6–8 months ahead for summer water-view rooms like the Knockabout or Daysailer. For fewer crowds and seasonal charm, consider May for vibrant gardens or September–October for autumn foliage. The inn’s concierge can guide you to the best tide schedules and lesser-known photography spots, ensuring you don’t miss a thing.
Start your day with a European-style breakfast featuring smoked fish, cured meats, and fresh fruit before heading out to catch the golden hour. Afterward, use the free WiFi to review your shots before venturing out again for sunset magic. Cape Cod Bay, paired with the thoughtful amenities at A Little Inn on Pleasant Bay, sets the stage for creating unforgettable coastal photography.
To nail your Cape Cod Bay photography, start by checking local tide charts. Align your shoot with either high or low tide, depending on the effect you’re after. For the most dramatic lighting, plan your session during the golden hour or around sunset. Low tide is especially rewarding, as it unveils sandbars and reflective surfaces that can elevate your compositions. Keep in mind that tide and light conditions shift daily and seasonally, so adjust your schedule to capture the perfect balance of water and light.
When photographing Cape Cod Bay, switch to manual mode for greater control. Set a low ISO (100-200) to keep noise levels down and choose a smaller aperture (f/8 to f/11) to ensure your shots are sharp and detailed. Adjust the shutter speed depending on the light - go faster in bright daylight or slower if you're aiming for creative motion blur effects.
For better composition, activate the grid on your camera to keep the horizon straight. Adding a polarizing filter can also work wonders by cutting down glare from the water and sand, giving your photos a cleaner, more vibrant look.
To keep your gear in good shape after it's been exposed to salt or sand, start by rinsing it with fresh water to wash away any residue. Use a soft cloth or a microfiber towel to gently wipe it down. When it comes to tripods, focus on cleaning the legs and joints using a brush or cloth, and you might want to apply a protective spray for added care. Be cautious with electronic components - never expose them directly to water. Instead, use a damp cloth to clean these parts. Before storing your gear, make sure every part is completely dry to prevent damage.
If you're looking for a peaceful and personal Cape Cod experience, now's the time to book your stay at A Little Inn on Pleasant Bay. With its quiet setting, friendly hosts, and small seasonal touches that make a big difference, it’s a great place to relax and enjoy the best bed and breakfast in Cape Cod. Whether you’re planning a weekend getaway or a longer break, don’t wait too long—anytime is the best time to visit, and rooms fill up fast.


